Frequent questions

This article walks you through the steps to configure the following versions:

This article walks you through the steps to configure the following versions:

Step one: Verify that the email user exists in your web panel

Make sure your email username is already set up in the DreamHost panel and go to Manage Email.You will see your email username listed on the page: 

Step Two: Find Your Email Server

In the past, it was possible to use mail.example.com to connect (where example.com is your actual domain name). Due to the way modern mail clients handle security, this is NOT recommended now as it can lead to connection errors. Make sure you are only using the name of your mail server when connecting.

It will be one of the following depending on whether you are connecting using IMAP or POP:

IMAP Host Name : imap.dreamhost.com

POP Hostname : pop.dreamhost.com

When you set up the first email address on a domain (that is configured to be hosted with DreamHost), the DreamHost system automatically creates the necessary hostnames and MX records to process email for that domain. Also note that if this is your first address on a domain, it may take up to 6 hours for those emails to work. 

Step three: Set up a new account in Mail

1.Open the Apple Mail app by clicking the Mail icon at the bottom dock. You can also click the magnifying glass at the top right and type the word “Mail” in the search bar. 

2. If you need to add an additional account, click on ‘Mail> Add account…’.

3. The mail application opens and asks you to select an account provider.
The ‘Choose an email account provider…’ page opens: 

4. Select the Other email account … option and click the Continue button.This example uses the email address “admin@dreamhostexample.com” : 

5. Enter the following:

  • Full Name: This is how you would like your name to display when sending an email.
  • Email Address: This field must contain the full email address.
  • Password: This is the password you set up for the email when you created it in your panel.

6. Click the Login button when finished. 

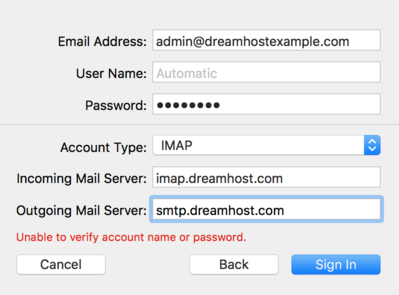
You should receive a notification reading the name or password cannot be identified. This is normal due to DreamHost’s mail server configuration.

7. To correct the error, make sure the following three fields are set:

  • Account Type: Choose IMAP or POP
  • Incoming Mail Server: The name of your mail server from step #2 above. This is either imap.dreamhost.com or pop.dreamhost.com.
  • Outgoing mail server: This is smtp.dreamhost.com.

In this example, IMAP is used as the connection, as this is the preferred protocol. But, if you want you can also use POP to connect.

8.Click the Login button to continue. 

9. Choose the apps you want to associate with this account and click Done.

Your new email address is now set up and ready to use. You can send a test message to confirm that it works correctly. 

Troubleshooting certificate mismatch errors

Scroll to Top